CyberShake Workflow Framework
This page provides documentation on the workflow framework that we use to execute CyberShake.
As of 2018, we use shock.usc.edu as our workflow submit host for CyberShake, but this setup could be replicated on any machine.
Contents
Overview
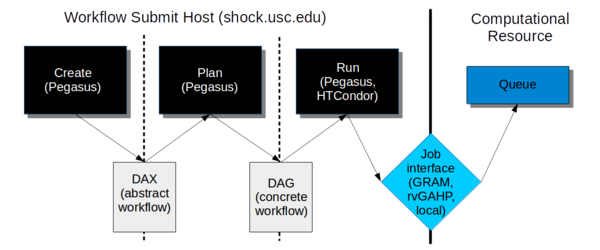
The workflow framework consists of three phases:
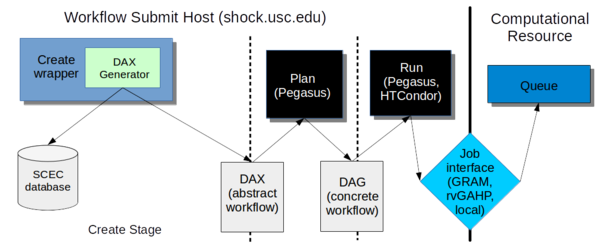
- Create. In this phase, we use the Pegasus API to create an "abstract description" of the workflow, so named because it does not have the specific paths or runtime configuration information for any system. It is a general description of the tasks to execute in the workflow, the input and output files, and the dependencies between them. This description is called a DAX and is in XML format.
- Plan. In this phase, we use the Pegasus planner to take our abstract description and convert it into a "concrete description" for execution on one or more specific computational resources. At this stage, paths to executables and specific configuration information, such as the correct certificate to use, what account to charge, etc. are added into the workflow. This description is called a DAG and consists of multiple files in a format expected by HTCondor.
- Run. In this phase, we use Pegasus to hand our DAG off to HTCondor, which supervises the execution of the workflow. HTCondor maintains a queue of jobs. Jobs with all their dependencies satisfied are eligible to run and are sent to their execution system.
We will go into each phase in more detail below.
Software Dependencies
Before attempting to create and execute a workflow, the following software dependencies must be satisfied.
Workflow Submit Host
In addition to Java 1.7+, we require the following software packages on the workflow submission host:
Pegasus-WMS
Purpose: We use Pegasus to create our workflow description and plan it for execution with HTCondor. Pegasus also provides a number of other features, such as automatically adding transfer jobs, wrapping jobs in kickstart for runtime statistics, using monitord to populate a database with metrics, and registering output files in a catalog.
How to obtain: You can download the latest version (binaries) from https://pegasus.isi.edu/downloads/, or clone the git repository at https://github.com/pegasus-isi/pegasus . Usually we clone the repo, as with some regularity we need new features implemented and tested. We are currently running 4.7.3dev on shock, but you should install the latest version.
Special installation instructions: Follow the instructions to build from source - it's straightforward. On shock, we install Pegasus into /opt/pegasus, and update the default link to point to our preferred version.
HTCondor
Purpose: HTCondor performs the actual execution of the workflow. Part of Condor, DAGMan, maintains a queue and keeps track of job dependencies, submitting jobs to the appropriate resource when it's time for them to run.
How to obtain: HTCondor is available at https://research.cs.wisc.edu/htcondor/downloads/, but installing from a repo is the preferred approach. We are currently running 8.4.8 on shock. You should install the 'Current Stable Release'.
Special installation instructions: We've been asking the system administrator to install it in shared space.
rvGAHP
To enable rvGAHP submission for systems which don't support remote authentication using proxies (currently Titan), you should configure rvGAHP on the submission host as described here: https://github.com/juve/rvgahp .
Remote Resource
Pegasus-WMS
On the remote resource, only the Pegasus-worker packages are technically required, but I recommend installing all of Pegasus anyway. This may also require installing Ant. Typically, we install Pegasus to <CyberShake home>/utils/pegasus.
GRAM submission
To support GRAM submission, the Globus Toolkit (http://toolkit.globus.org/toolkit/) needs to be installed on the remote system. It's already installed at Titan and Blue Waters. Since the toolkit reached end-of-life in January 2018, there is some uncertainty as to what we will move to.
rvGAHP submission
For rvGAHP submission - our approach for systems which do not permit the use of proxies for remote authentication - you should follow the instructions at https://github.com/juve/rvgahp to set up rvGAHP correctly.
Create
In the creation stage, we invoke a wrapper script which calls the DAX Generator, which creates the DAX file for a CyberShake workflow.
At creation, we decide which workflow we want to run -- SGT only, post-processing only, or both ('integrated'). The reason for this option is that often we want to run the SGT and post-processing workflows in different places. For example, we might want to run the SGT workflow on Titan because of the large number of GPUs, and then the post-processing on Blue Waters because of its XE nodes. If you create an integrated workflow, both the SGT and post-processing parts will run on the same machine. (This is because of the way that we've set up the planning scripts; this could be changed in the future if needed).
Wrapper Script
Four wrapper scripts are available, depending on which kind of workflow you are creating.
create_sgt_dax.sh
Purpose: To create the DAX files for an SGT-only workflow.
Detailed description: create_sgt_dax.sh takes the command-line arguments and determines a Run ID to assign to the run.
Needs to be changed if:
- The CyberShake volume depth needs to be changed, so as to have the right number of grid points. That is set in the genGrid() function in GenGrid_py/gen_grid.py, in km.
- X and Y padding needs to be altered. That is set using 'bound_pad' in Modelbox/get_modelbox.py, around line 70.
- The rotation of the simulation volume needs to be changed. That is set using 'model_rot' in Modelbox/get_modelbox.py, around line 70.
- The database access parameters have changed. That's in Modelbox/get_modelbox.py, around line 80.
- The divisibility needs for GPU simulations change (currently, we need the dimensions to be evenly divisible by the number of GPUs used in that dimension. That is in Modelbox/get_modelbox.py, around line 250.
Source code location: http://source.usc.edu/svn/cybershake/import/trunk/PreCVM/
Author: Rob Graves, wrapped by Scott Callaghan
Dependencies: Getpar, MySQLdb for Python
Executable chain:
 pre_cvm.py
   Modelbox/get_modelbox.py
     Modelbox/bin/gcproj
   GenGrid_py/gen_grid.py
     GenGrid_py/bin/gen_model_cords
Compile instructions:Run 'make' in the Modelbox/src and the GenGrid_py/src directories.
Usage:
Usage: pre_cvm.py [options]
  Options:
  -h, --help            show this help message and exit
  --site=SITE           Site name
  --erf_id=ERF_ID       ERF ID
  --modelbox=MODELBOX   Path to modelbox file (output)
  --gridfile=GRIDFILE   Path to gridfile (output)
  --gridout=GRIDOUT     Path to gridout (output)
  --coordfile=COORDSFILE
                        Path to coorfile (output)
  --paramsfile=PARAMSFILE
                        Path to paramsfile (output)
  --boundsfile=BOUNDSFILE
                        Path to boundsfile (output)
  --frequency=FREQUENCY
                        Frequency
  --gpu                 Use GPU box settings.
  --spacing=SPACING     Override default spacing with this value.
  --server=SERVER       Address of server to query in creating modelbox,
                        default is focal.usc.edu.
Typical run configuration: Serial; requires 6 minutes for 100m spacing, 10 billion point volume
Input files: None; inputs are retrieved from the database
Output files: modelbox, gridfile, gridout, params, coord, bounds
- SGT workflow only: create_sgt_dax.sh
- Post-processing workflow: create_pp_wf.sh
DAX Generator
The DAX Generator consists of multiple complex Java classes. It supports a large number of arguments, enabling the user to select the CyberShake science parameters (site, erf, velocity model, rupture variation scenario id, frequency, spacing, minimum vs cutoff) and the technical parameters (which post-processing code to select, which SGT code, etc.) to perform the run with. Different entry classes support creating just an SGT workflow, just a post-processing (+ data product creation) workflow, or both combined into an integrated workflow.
A detailed overview of the DAX Generator is available here: CyberShake DAX Generator.

