Difference between revisions of "Study 14.2 Data Products"
From SCECpedia
Jump to navigationJump to search| (9 intermediate revisions by 2 users not shown) | |||
| Line 8: | Line 8: | ||
{| | {| | ||
| − | | [[File:Study_14.2_GPU_CVMS426.150.png|356px|thumb|left|CyberShake Study 14.2 GPU CVM-S4.26 Hazard Map ([http://hypocenter.usc.edu/research/cybershake/study_14_2/gpu_cvms426/interpolated.300.png 300 ppi], [http://hypocenter.usc.edu/research/cybershake/study_14_2/gpu_cvms426/interpolated | + | | [[File:Study_14.2_GPU_CVMS426.150.png|356px|thumb|left|CyberShake Study 14.2 GPU CVM-S4.26 Hazard Map ([http://hypocenter.usc.edu/research/cybershake/study_14_2/gpu_cvms426/interpolated.300.png 300 ppi], [http://hypocenter.usc.edu/research/cybershake/study_14_2/gpu_cvms426/interpolated.ps ps file])]] |
| − | | [[File:Study_14.2_GPU_CVMS426_with_sites.150.png|356px|thumb|left|CyberShake Study 14.2 GPU CVM-S4.26 Hazard Map, sites marked ([http://hypocenter.usc.edu/research/cybershake/study_14_2/gpu_cvms426/interpolated_marks.300.png 300 ppi], [http://hypocenter.usc.edu/research/cybershake/study_14_2/gpu_cvms426/interpolated_marks | + | | [[File:Study_14.2_GPU_CVMS426_with_sites.150.png|356px|thumb|left|CyberShake Study 14.2 GPU CVM-S4.26 Hazard Map, sites marked ([http://hypocenter.usc.edu/research/cybershake/study_14_2/gpu_cvms426/interpolated_marks.300.png 300 ppi], [http://hypocenter.usc.edu/research/cybershake/study_14_2/gpu_cvms426/interpolated_marks.ps ps file])]] |
|} | |} | ||
==== AWP-ODC-SGT GPU, BBP 1D ==== | ==== AWP-ODC-SGT GPU, BBP 1D ==== | ||
| + | |||
| + | {| | ||
| + | | [[File:Study_14.2_GPU_BBP_1D.150.png|356px|thumb|left|CyberShake Study 14.2 GPU BBP 1D Hazard Map ([http://hypocenter.usc.edu/research/cybershake/study_14_2/gpu_bbp1d/interpolated.300.png 300 ppi], [http://hypocenter.usc.edu/research/cybershake/study_14_2/gpu_bbp1d/interpolated.ps ps file])]] | ||
| + | | [[File:Study_14.2_GPU_BBP_1D_with_sites.150.png|356px|thumb|left|CyberShake Study 14.2 GPU BBP 1D Hazard Map, sites marked ([http://hypocenter.usc.edu/research/cybershake/study_14_2/gpu_bbp1d/interpolated_marks.300.png 300 ppi], [http://hypocenter.usc.edu/research/cybershake/study_14_2/gpu_bbp1d/interpolated_marks.ps ps file])]] | ||
| + | |} | ||
==== AWP-ODC-SGT CPU, CVM-S4.26 ==== | ==== AWP-ODC-SGT CPU, CVM-S4.26 ==== | ||
| − | + | {| | |
| + | | [[File:Study_14.2_CPU_CVMS426.150.png|356px|thumb|left|CyberShake Study 14.2 CPU CVM-S4.26 Hazard Map ([http://hypocenter.usc.edu/research/cybershake/study_14_2/cpu_cvms426/interpolated.300.png 300 ppi], [http://hypocenter.usc.edu/research/cybershake/study_14_2/cpu_cvms426/interpolated.ps ps file])]] | ||
| + | | [[File:Study_14.2_CPU_CVMS426_with_sites.150.png|356px|thumb|left|CyberShake Study 14.2 CPU CVM-S4.26 Hazard Map, sites marked ([http://hypocenter.usc.edu/research/cybershake/study_14_2/cpu_cvms426/interpolated_marks.300.png 300 ppi], [http://hypocenter.usc.edu/research/cybershake/study_14_2/cpu_cvms426/interpolated_marks.ps ps file])]] | ||
| + | |} | ||
==== AWP-ODC-SGT CPU, CVM-H 11.9, no GTL ==== | ==== AWP-ODC-SGT CPU, CVM-H 11.9, no GTL ==== | ||
| + | {| | ||
| + | | [[File:Study_14.2_CPU_CVMH_noGTL.150.png|356px|thumb|left|CyberShake Study 14.2 CPU CVM-H 11.9, no GTL Hazard Map ([http://hypocenter.usc.edu/research/cybershake/study_14_2/cpu_cvmh_nogtl/interpolated.300.png 300 ppi], [http://hypocenter.usc.edu/research/cybershake/study_14_2/cpu_cvmh_nogtl/interpolated.ps ps file])]] | ||
| + | | [[File:Study_14.2_CPU_CVMH_noGTL_with_sites.150.png|356px|thumb|left|CyberShake Study 14.2 CPU CVM-H 11.9, no GTL Hazard Map, sites marked ([http://hypocenter.usc.edu/research/cybershake/study_14_2/cpu_cvmh_nogtl/interpolated_marks.300.png 300 ppi], [http://hypocenter.usc.edu/research/cybershake/study_14_2/cpu_cvmh_nogtl/interpolated_marks.ps ps file])]] | ||
| + | |} | ||
| − | + | === Comparison between velocity models === | |
| − | === | + | ==== CVM-S4.26 (GPU) vs CVM-S (CPU) ==== |
| + | |||
| + | {| | ||
| + | | [[File:Study_14.2_GPU_CVMS426_vs_CPU_CVMS_diff.png|356px|thumb|left|GPU, CVM-S4.26 vs CPU, CVM-S Difference Map. Reds and oranges are higher CVM-S4.26 hazard, greens and blues lower. ([http://hypocenter.usc.edu/research/cybershake/study_14_2/gpu_cvms426/gpu_cvms426_vs_cpu_cvms4_diff.300.png 300 ppi], [http://hypocenter.usc.edu/research/cybershake/study_14_2/gpu_cvms426/gpu_cvms426_vs_cpu_cvms4_diff.ps ps file], [http://hypocenter.usc.edu/research/cybershake/study_14_2/gpu_cvms426/gpu_cvms426_vs_cpu_cvms4_diff_marks.300.png 300 ppi with sites], [http://hypocenter.usc.edu/research/cybershake/study_14_2/gpu_cvms426/gpu_cvms426_vs_cpu_cvms4_diff_marks.ps ps file with sites])]] | ||
| + | | [[File:Study_14.2_GPU_CVMS426_vs_CPU_CVMS_ratio.png|356px|thumb|left|GPU, CVM-S4.26 vs CPU, CVM-S Ratio Map. Reds and oranges are higher CVM-S4.26 hazard, greens and blues lower. ([http://hypocenter.usc.edu/research/cybershake/study_14_2/gpu_cvms426/gpu_cvms426_vs_cpu_cvms4_ratio.300.png 300 ppi], [http://hypocenter.usc.edu/research/cybershake/study_14_2/gpu_cvms426/gpu_cvms426_vs_cpu_cvms4_ratio.ps ps file], [http://hypocenter.usc.edu/research/cybershake/study_14_2/gpu_cvms426/gpu_cvms426_vs_cpu_cvms4_ratio_marks.300.png 300 ppi with sites], [http://hypocenter.usc.edu/research/cybershake/study_14_2/gpu_cvms426/gpu_cvms426_vs_cpu_cvms4_ratio_marks.ps ps file with sites])]] | ||
| + | |} | ||
| + | |||
| + | ==== CVM-S4.26 (GPU) vs CVM-H 11.9 (CPU) ==== | ||
| + | |||
| + | {| | ||
| + | | [[File:Study_14.2_GPU_CVMS426_vs_CPU_CVMH_diff.png|356px|thumb|left|GPU, CVM-S4.26 vs CPU, CVM-H 11.9 Difference Map. Reds and oranges are higher CVM-S4.26 hazard, greens and blues lower. ([http://hypocenter.usc.edu/research/cybershake/study_14_2/gpu_cvms426/gpu_cvms426_vs_cpu_cvmh_diff.300.png 300 ppi], [http://hypocenter.usc.edu/research/cybershake/study_14_2/gpu_cvms426/gpu_cvms426_vs_cpu_cvmh_diff.ps ps file], [http://hypocenter.usc.edu/research/cybershake/study_14_2/gpu_cvms426/gpu_cvms426_vs_cpu_cvmh_diff_marks.300.png 300 ppi with sites], [http://hypocenter.usc.edu/research/cybershake/study_14_2/gpu_cvms426/gpu_cvms426_vs_cpu_cvmh_diff_marks.ps ps file with sites])]] | ||
| + | | [[File:Study_14.2_GPU_CVMS426_vs_CPU_CVMH_ratio.png|356px|thumb|left|GPU, CVM-S4.26 vs CPU, CVM-H 11.9 Ratio Map. Reds and oranges are higher CVM-S4.26 hazard, greens and blues lower. ([http://hypocenter.usc.edu/research/cybershake/study_14_2/gpu_cvms426/gpu_cvms426_vs_cpu_cvmh_ratio.300.png 300 ppi], [http://hypocenter.usc.edu/research/cybershake/study_14_2/gpu_cvms426/gpu_cvms426_vs_cpu_cvmh_ratio.ps ps file], [http://hypocenter.usc.edu/research/cybershake/study_14_2/gpu_cvms426/gpu_cvms426_vs_cpu_cvmh_ratio_marks.300.png 300 ppi with sites], [http://hypocenter.usc.edu/research/cybershake/study_14_2/gpu_cvms426/gpu_cvms426_vs_cpu_cvmh_ratio_marks.ps ps file with sites])]] | ||
| + | |} | ||
| + | |||
| + | ==== BBP 1D (GPU) vs CVM-S4.26 (GPU) ==== | ||
| + | |||
| + | |||
| + | {| | ||
| + | | [[File:Study_14.2_BBP_1D_vs_CVMS426_diff.png|356px|thumb|left|BBP 1D vs CVM-S4.26 Difference Map. Reds and oranges are higher BBP 1D hazard, greens and blues lower. ([http://hypocenter.usc.edu/research/cybershake/study_14_2/gpu_bbp1d/gpu_bbp1d_vs_gpu_cvms426_diff.300.png 300 ppi], [http://hypocenter.usc.edu/research/cybershake/study_14_2/gpu_bbp1d/gpu_bbp1d_vs_gpu_cvms426_diff.ps ps file], [http://hypocenter.usc.edu/research/cybershake/study_14_2/gpu_bbp1d/gpu_bbp1d_vs_gpu_cvms426_diff_marks.300.png 300 ppi with sites], [http://hypocenter.usc.edu/research/cybershake/study_14_2/gpu_bbp1d/gpu_bbp1d_vs_gpu_cvms426_diff_marks.ps ps file with sites])]] | ||
| + | | [[File:Study_14.2_BBP_1D_vs_CVMS426_ratio.png|356px|thumb|left|BBP 1D vs CVM-S4.26 Ratio Map. Reds and oranges are higher BBP 1D hazard, greens and blues lower. ([http://hypocenter.usc.edu/research/cybershake/study_14_2/gpu_bbp1d/gpu_bbp1d_vs_gpu_cvms426_ratio.300.png 300 ppi], [http://hypocenter.usc.edu/research/cybershake/study_14_2/gpu_bbp1d/gpu_bbp1d_vs_gpu_cvms426_ratio.ps ps file], [http://hypocenter.usc.edu/research/cybershake/study_14_2/gpu_bbp1d/gpu_bbp1d_vs_gpu_cvms426_ratio_marks.300.png 300 ppi with sites], [http://hypocenter.usc.edu/research/cybershake/study_14_2/gpu_bbp1d/gpu_bbp1d_vs_gpu_cvms426_ratio_marks.ps ps file with sites])]] | ||
| + | |} | ||
| − | ==== | + | ==== GPU vs CPU (CVM-S4.26) ==== |
| + | {| | ||
| + | | [[File:Study_14.2_CPU_vs_GPU_CVMS426_diff.png|356px|thumb|left|CPU vs GPU CVM-S4.26 Difference Map. Reds and oranges are higher CPU hazard, greens and blues lower. ([http://hypocenter.usc.edu/research/cybershake/study_14_2/cpu_cvms426/cpu_cvms426_vs_gpu_cvms426_diff.300.png 300 ppi], [http://hypocenter.usc.edu/research/cybershake/study_14_2/cpu_cvms426/cpu_cvms426_vs_gpu_cvms426_diff.ps ps file], [http://hypocenter.usc.edu/research/cybershake/study_14_2/cpu_cvms426/cpu_cvms426_vs_gpu_cvms426_diff_marks.300.png 300 ppi with sites], [http://hypocenter.usc.edu/research/cybershake/study_14_2/cpu_cvms426/cpu_cvms426_vs_gpu_cvms426_diff_marks.ps ps file with sites])]] | ||
| + | | [[File:Study_14.2_CPU_vs_GPU_CVMS426_ratio.png|356px|thumb|left|CPU vs GPU CVM-S4.26 Ratio Map. Reds and oranges are higher CPU hazard, greens and blues lower. ([http://hypocenter.usc.edu/research/cybershake/study_14_2/cpu_cvms426/cpu_cvms426_vs_gpu_cvms426_ratio.300.png 300 ppi], [http://hypocenter.usc.edu/research/cybershake/study_14_2/cpu_cvms426/cpu_cvms426_vs_gpu_cvms426_ratio.ps ps file], [http://hypocenter.usc.edu/research/cybershake/study_14_2/cpu_cvms426/cpu_cvms426_vs_gpu_cvms426_ratio_marks.300.png 300 ppi with sites], [http://hypocenter.usc.edu/research/cybershake/study_14_2/cpu_cvms426/cpu_cvms426_vs_gpu_cvms426_ratio_marks.ps ps file with sites])]] | ||
| + | |} | ||
| − | ==== | + | ==== CVM-H 11.9, no GTL (GPU) vs CVM-H 11.9 (CPU) ==== |
| + | {| | ||
| + | | [[File:Study_14.2_CVMH_noGTL_vs_CVMH_diff.png|356px|thumb|left|GPU CVM-H 11.9, no GTL vs CPU CVM-H 11.9 Difference Map. Reds and oranges are higher CVM-H no GTL hazard, greens and blues lower. ([http://hypocenter.usc.edu/research/cybershake/study_14_2/cpu_cvmh_nogtl/cvmh_nogtl_vs_cvmh_diff.300.png 300 ppi], [http://hypocenter.usc.edu/research/cybershake/study_14_2/cpu_cvmh_nogtl/cvmh_nogtl_vs_cvmh_diff.ps ps file], [http://hypocenter.usc.edu/research/cybershake/study_14_2/cpu_cvmh_nogtl/cvmh_nogtl_vs_cvmh_diff_marks.300.png 300 ppi with sites], [http://hypocenter.usc.edu/research/cybershake/study_14_2/cpu_cvmh_nogtl/cvmh_nogtl_vs_cvmh_diff_marks.ps ps file with sites])]] | ||
| + | | [[File:Study_14.2_CVMH_noGTL_vs_CVMH_ratio.png|356px|thumb|left|GPU CVM-H 11.9, no GTL vs CPU CVM-H 11.9 Ratio Mao. Reds and oranges are higher CVM-H no GTL hazard, greens and blues lower. ([http://hypocenter.usc.edu/research/cybershake/study_14_2/cpu_cvmh_nogtl/cvmh_nogtl_vs_cvmh_ratio.300.png 300 ppi], [http://hypocenter.usc.edu/research/cybershake/study_14_2/cpu_cvmh_nogtl/cvmh_nogtl_vs_cvmh_ratio.ps ps file], [http://hypocenter.usc.edu/research/cybershake/study_14_2/cpu_cvmh_nogtl/cvmh_nogtl_vs_cvmh_ratio_marks.300.png 300 ppi with sites], [http://hypocenter.usc.edu/research/cybershake/study_14_2/cpu_cvmh_nogtl/cvmh_nogtl_vs_cvmh_ratio_marks.ps ps file with sites])]] | ||
| + | |} | ||
| − | ==== | + | == Related Entries == |
| + | *[[CyberShake Study 14.2]] | ||
| + | *[[CyberShake]] | ||
Latest revision as of 18:54, 3 September 2014
Contents
Hazard Maps
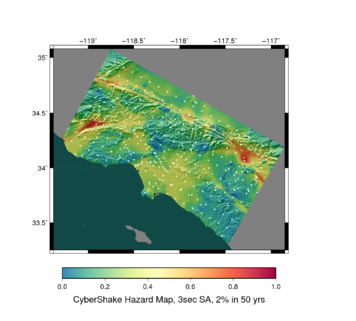
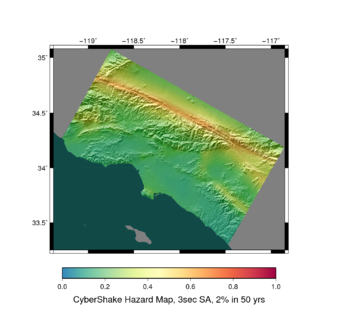
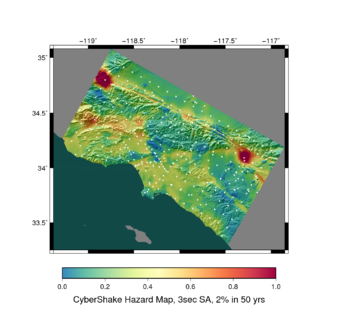
Below are hazard maps at 150 ppi. Higher resolution images are linked in the image captions.
Basic Hazard Maps (3s)
AWP-ODC-SGT GPU, CVM-S4.26
AWP-ODC-SGT GPU, BBP 1D
AWP-ODC-SGT CPU, CVM-S4.26
AWP-ODC-SGT CPU, CVM-H 11.9, no GTL
Comparison between velocity models
CVM-S4.26 (GPU) vs CVM-S (CPU)
 GPU, CVM-S4.26 vs CPU, CVM-S Difference Map. Reds and oranges are higher CVM-S4.26 hazard, greens and blues lower. (300 ppi, ps file, 300 ppi with sites, ps file with sites) |
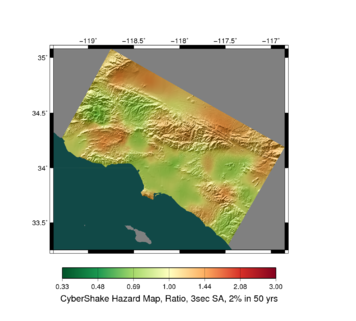 GPU, CVM-S4.26 vs CPU, CVM-S Ratio Map. Reds and oranges are higher CVM-S4.26 hazard, greens and blues lower. (300 ppi, ps file, 300 ppi with sites, ps file with sites) |
CVM-S4.26 (GPU) vs CVM-H 11.9 (CPU)
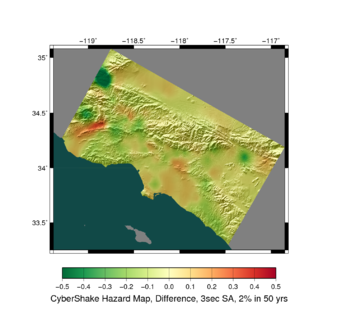 GPU, CVM-S4.26 vs CPU, CVM-H 11.9 Difference Map. Reds and oranges are higher CVM-S4.26 hazard, greens and blues lower. (300 ppi, ps file, 300 ppi with sites, ps file with sites) |
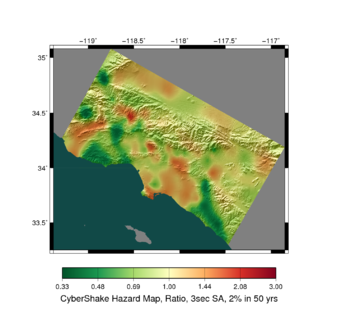 GPU, CVM-S4.26 vs CPU, CVM-H 11.9 Ratio Map. Reds and oranges are higher CVM-S4.26 hazard, greens and blues lower. (300 ppi, ps file, 300 ppi with sites, ps file with sites) |
BBP 1D (GPU) vs CVM-S4.26 (GPU)
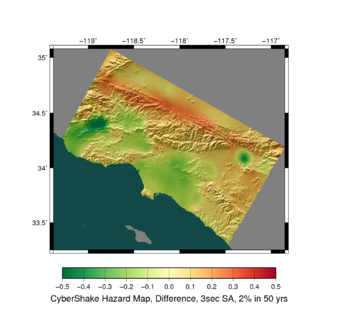 BBP 1D vs CVM-S4.26 Difference Map. Reds and oranges are higher BBP 1D hazard, greens and blues lower. (300 ppi, ps file, 300 ppi with sites, ps file with sites) |
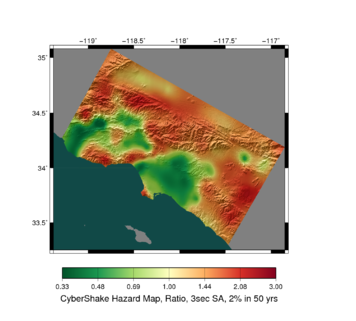 BBP 1D vs CVM-S4.26 Ratio Map. Reds and oranges are higher BBP 1D hazard, greens and blues lower. (300 ppi, ps file, 300 ppi with sites, ps file with sites) |
GPU vs CPU (CVM-S4.26)
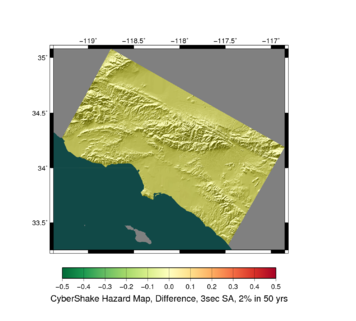 CPU vs GPU CVM-S4.26 Difference Map. Reds and oranges are higher CPU hazard, greens and blues lower. (300 ppi, ps file, 300 ppi with sites, ps file with sites) |
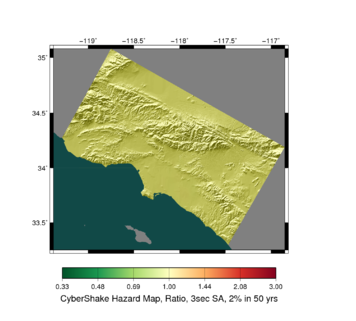 CPU vs GPU CVM-S4.26 Ratio Map. Reds and oranges are higher CPU hazard, greens and blues lower. (300 ppi, ps file, 300 ppi with sites, ps file with sites) |
CVM-H 11.9, no GTL (GPU) vs CVM-H 11.9 (CPU)
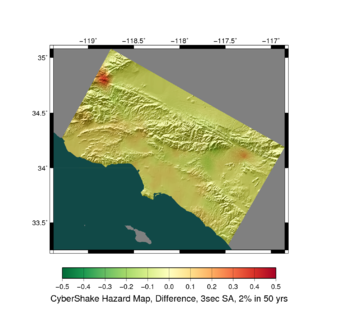 GPU CVM-H 11.9, no GTL vs CPU CVM-H 11.9 Difference Map. Reds and oranges are higher CVM-H no GTL hazard, greens and blues lower. (300 ppi, ps file, 300 ppi with sites, ps file with sites) |
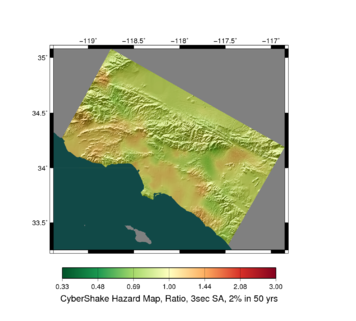 GPU CVM-H 11.9, no GTL vs CPU CVM-H 11.9 Ratio Mao. Reds and oranges are higher CVM-H no GTL hazard, greens and blues lower. (300 ppi, ps file, 300 ppi with sites, ps file with sites) |

