Difference between revisions of "CyberShake MareNostrum Training"
| Line 277: | Line 277: | ||
</pre> | </pre> | ||
| − | When complete, you will have 395 Seismogram, PeakVals, RotD, and Duration files. File formats are described in detail [[CyberShake_Data#CyberShake_output_data | here]] | + | When complete, you will have 395 Seismogram, PeakVals, RotD, and Duration files. File formats are described in detail [[CyberShake_Data#CyberShake_output_data | here]]. |
</ol> | </ol> | ||
Revision as of 22:19, 13 February 2020
This page provides training for running the CyberShake TEST site on MareNostrum (MN4)
Contents
Training overview
The goal of this training is to get you to run by hand all the steps involved in a CyberShake run. Here are the basic steps involved in the training:
- Set up needed files
- Initialize database with run information
- Create Strain Green Tensors
- Create synthetic seismograms and intensity measures
- Populate database with intensity measures
- Populate Hazard Dataset
- Plot hazard curves
Actions you need to take will be in bold.
Terminal commands and output will be in this font.
My username is pr1ejg10 and my project is pr1ejg00.  Replace <username> or <working dir> with your username or your working directory, respectively.
Set up needed files
- Create a directory to work from. I recommend something in scratch.
- Copy in my training database from /gpfs/projects/pr1ejg00/CyberShake/database/training.sqlite.
- In order to look at this database, we need sqlite. Add the SQLite module to your environment.
- Let's examine this database. Use sqlite3 to investigate the tables.
pr1ejg10@login2:/gpfs/scratch/pr1ejg00/pr1ejg10/TEST> sqlite3 training.sqlite SQLite version 3.20.0 2017-07-10 19:08:59 Enter ".help" for usage hints. sqlite> .tables CyberShake_Runs IM_Types CyberShake_Site_Regions PeakAmplitudes CyberShake_Site_Ruptures Rupture_Variation_Scenario_IDs CyberShake_Site_Types Rupture_Variation_Scenario_Metadata CyberShake_Sites Rupture_Variations ERF_IDs Ruptures ERF_Metadata SGT_Variation_IDs ERF_Probability_Models Studies Hazard_Curve_Points Velocity_Model_Metadata Hazard_Curves Velocity_Models Hazard_Datasets sqlite> .schema Velocity_Models CREATE TABLE Velocity_Models ( Velocity_Model_ID integer primary key AUTOINCREMENT not null , Velocity_Model_Name varchar(50) not null, Velocity_Model_Version varchar(50) not null ); sqlite> select * from Velocity_Models; 1|CVM-S4.26|4.26
I have pre-inserted some of the setup you'll need, such as Ruptures, Rupture_Variations, and CyberShake_Site_Ruptures. For queries and insertions, SQLite uses practically identical syntax to MySQL. To quit, type .quit.
Note that not all the tables defined in the full CyberShake schema are in this test database.
pr1ejg10@login2:~> cd /gpfs/scratch/pr1ejg00/<username>
pr1ejg10@login2:/gpfs/scratch/pr1ejg00/pr1ejg10> mkdir TEST
pr1ejg10@login2:/gpfs/scratch/pr1ejg00/pr1ejg10> cd TEST
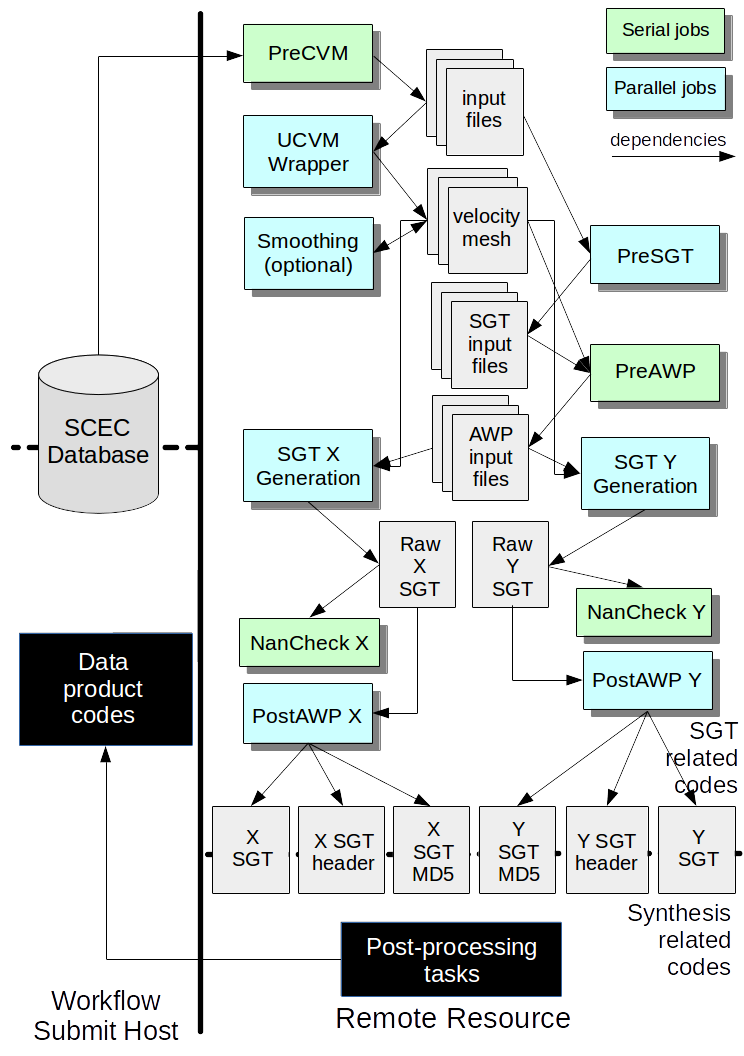
An overview of the code involved in CyberShake is provided here. For this test, we are using the SGT-related codes, the PP-related codes, and the Data Products codes, but not the Stochastic codes.
Since MN4 does not permit outgoing connections, it is impossible to install CyberShake on MN4 directly from the repository. For the purposes of this training, I suggest you use my install directly. My CyberShake installation is located at:
/gpfs/projects/pr1ejg00/CyberShake
Due to the outgoing connection problem, on MN4 we are using a local SQLite database rather than a remote MySQL database, which is what SCEC's CyberShake install uses. Each trainee should work from their own database.
pr1ejg10@login2:/gpfs/scratch/pr1ejg00/pr1ejg10/TEST> cp /gpfs/projects/pr1ejg00/CyberShake/database/training.sqlite .
pr1ejg10@login2:/gpfs/scratch/pr1ejg00/pr1ejg10/TEST> module load sqlite
Initialize database with run information
CyberShake keeps track of what we call 'runs' in the database. A run is a full CyberShake calculation for a single site.
When we run large CyberShake studies, we have scripts which automatically create runs as part of our workflows. For this test, we will populate the database ourselves.
- Create a database entry for our test run. We will only specify the fields in the CyberShake_Runs table which are required. Some of them make less sense not in the workflow context. First, we will determine the site, velocity model, ERF, rupture variation scenario, and SGT variation IDs needed.
- Determine the run ID, which you'll use for your test.
- Exit sqlite. We're done with it for now.
sqlite> select * from CyberShake_Sites;
1|CyberShake Verification Test - USC|TEST|34.0192|-118.286|1
sqlite> select * from Velocity_Models;
1|CVM-S4.26|4.26
sqlite> select * from ERF_IDs;
35|WGCEP (2007) UCERF2 - Single Branch|Mean UCERF 2 - Single Branch Earthquake Rupture Forecast FINAL|1|1
36|WGCEP (2007) UCERF2 - Single Branch 200m| Mean UCERF 2 - Single Branch Earthquake Rupture Forecast FINAL, 200m|1|1
sqlite> select * from SGT_Variation_IDs;
1|AWP_ODC_SGT|SGTs generated with AWP-ODC-SGT with Qp=Qs=10000
2|AWP_ODC_SGT GPU|SGTs generated with AWP-ODC-SGT GPU
sqlite> select * from Rupture_Variation_Scenario_IDs;
1|36|genslip-v3.3.1b|Graves & Pitarka (2014) with uniform grid down dip hypocenter location, modified rupture variation constant
insert into CyberShake_Runs(Site_ID, ERF_ID, SGT_Variation_ID, Velocity_Model_ID, Rup_Var_Scenario_ID, Status, Status_Time, Last_User, Max_Frequency, Low_Frequency_Cutoff, SGT_Source_Filter_Frequency) values (1, 36, 1, 1, 1, "SGT Started", "2020-02-14 12:00:00", "<username>", 0.5, 0.5, 1.0)
sqlite> select Run_ID from CyberShake_Runs;
1
sqlite> .quit
Create Strain Green Tensors
As outlined here, there are 7 jobs we need to run to generate SGTs for our test site.
PreCVM
Details about this stage are available here. This stage may be modified for Iceland, since each site may end up using the same volume. Note that the volume dimensions must be evenly divisible by the number of cores in that dimension.
- Copy over my PreCVM batch script from /gpfs/scratch/pr1ejg00/pr1ejg10/TEST/precvm.slrm .
- Edit the batch script to change the sqlite path (--server sqlite:...) to point to your sqlite file instead of mine.
- Submit the job. When complete, make sure there are no errors in precvm.e .
pr1ejg10@login2:/gpfs/scratch/pr1ejg00/pr1ejg10/TEST> cp /gpfs/scratch/pr1ejg00/pr1ejg10/TEST/precvm.slrm .
UCVM
PreCVM must finish before you can run this stage.
Details about this stage are available here. This stage will not be part of the Icelandic processing - you won't use UCVM to create a velocity model - but some other code will provide one.
- Copy over my UCVM batch script from /gpfs/scratch/pr1ejg00/pr1ejg10/TEST/ucvm.slrm .
- Submit the job. When complete, make sure there are no errors in ucvm.e .This is a parallel job, and may wait in the queue for some time before running.
PreSGT
PreCVM must finish before you can run this stage, but it can run concurrently with UCVM.
Details about this stage are available here.
- Copy over my PreSGT batch script from /gpfs/scratch/pr1ejg00/pr1ejg10/TEST/presgt.slrm .
- Submit the job. When complete, make sure there are no errors in presgt.e .
PreAWP
UCVM and PreSGT must finish before you can run this stage. Note that we're skipping the Smoothing step, since we're only using a single velocity model.
Details about this stage are available here.
- Copy over my PreAWP batch script from /gpfs/scratch/pr1ejg00/pr1ejg10/TEST/preawp.slrm .
- Edit the script so that '--run-id 1' uses your correct run id, which might not be 1.
- Submit the job. When complete, make sure there are no errors in preawp.e .
SGT
PreAWP must finish before you can run this stage.
Details about this stage are available here.
We run two SGTs, one for each horizontal component. They can run concurrently. PreAWP set up the input files needed for both horizontal components. If you'd like to run the vertical also, you'd need to make changes to PreAWP.
- Copy over my SGT x and SGT y batch scripts from /gpfs/scratch/pr1ejg00/pr1ejg10/TEST/awp_x.slrm and awp_y.slrm .
- Submit the job. When complete, check awp_x.e and awp_y.e . We usually see lines like:
Note: The following floating-point exceptions are signalling: IEEE_INVALID_FLAG IEEE_UNDERFLOW_FLAG IEEE_DENORMAL
This is OK and is not an error.
This job runs on 1700 cores, so you may need to wait in the queue for a while before it runs.
NaNCheck
We run two of these as well, one for each horizontal component. The SGT for that component must finish before you can run this stage.
Details about this stage are available here.
- Copy over my Check batch scripts from /gpfs/scratch/pr1ejg00/pr1ejg10/TEST/check_x.slrm and check_y.slrm .
- Submit the jobs. When complete, make sure there are no errors in check_x.e or check_y.e .
PostAWP
We also run two of these. The SGT for the component must finish before you can run this stage, but it can run concurrently with NaNCheck.
Details about this stage are available here.
- Copy over my Post batch scripts from /gpfs/scratch/pr1ejg00/pr1ejg10/TEST/post_x.slrm and post_y.slrm .
- Change the RUN_ID variable to be set to your run ID.
- Submit the jobs. When complete, make sure there are no errors in post_x.e or post_y.e .
Congratulations, you have generated a pair of SGTs!
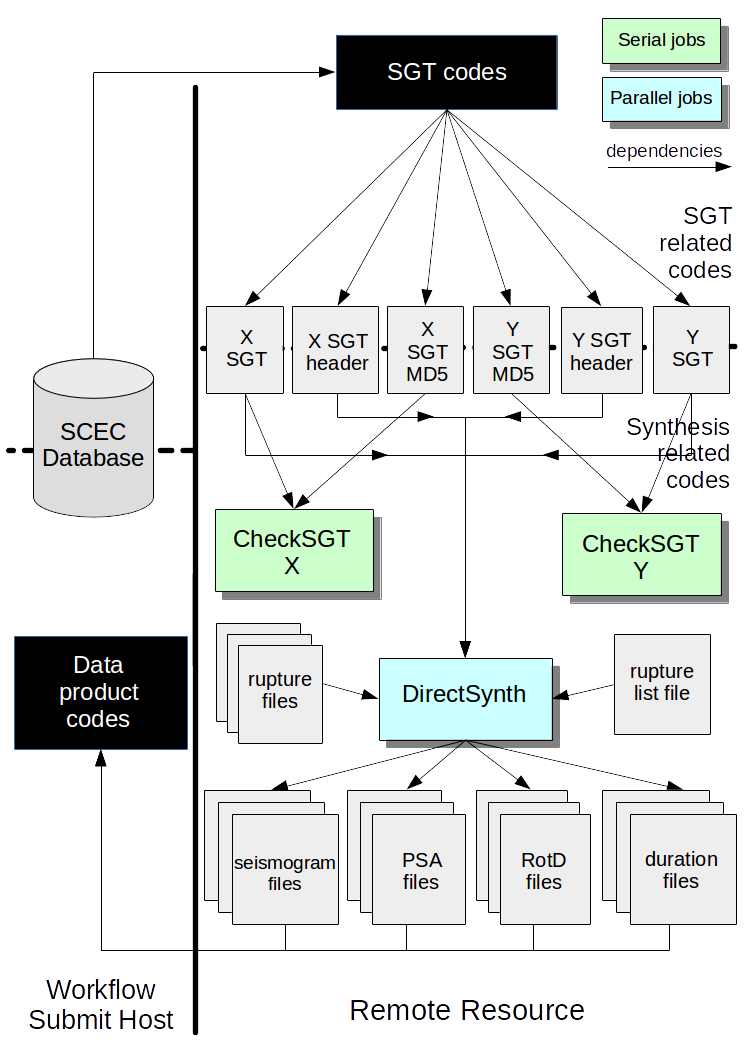
Post-processing
The post-processing steps are illustrated in this diagram. Since you're not moving the SGTs between systems, we can skip the md5sum check stage, so we only have one stage to run.
Details about DirectSynth, the seismogram synthesis stage, are available here .
This step requires a bit more setup than the previous ones. We must provide a list of all the ruptures which need their seismograms synthesized, and typically I symlink both the rupture geometry files (from which rupture variations are generated), the SGT files, and their headers.
- Create a directory for the post-processing inside your working directory.
- Copy in the rupture file list from /gpfs/scratch/pr1ejg00/pr1ejg10/TEST/post-processing/rupture_file_list_TEST .
- Symlink the *.sgt and *.sgthead files you created earlier into the post-processing directory.
- Create symlinks to all the rupture geometry files. You can use my helper script, /gpfs/scratch/pr1ejg00/pr1ejg10/TEST/post-processing/make_lns.py.
- Copy in the batch script from /gpfs/scratch/pr1ejg00/pr1ejg10/TEST/post-processing/run_ds.slrm .
- Edit run_ds.slrm so RUN_ID uses the correct run id.
- Run the job. This one may also take a while in the queue.
- Check two places for errors. Check both the end of ds.e, and also the end of log.84. At the end of log.84 you should see something like:
pr1ejg10@login2:/gpfs/scratch/pr1ejg00/pr1ejg10/TEST> mkdir post-processing
pr1ejg10@login2:/gpfs/scratch/pr1ejg00/pr1ejg10/TEST> cd post-processing
pr1ejg10@login2:/gpfs/scratch/pr1ejg00/pr1ejg10/TEST/post-processing> ln -s ../TEST_fx_<run id>.sgt
pr1ejg10@login2:/gpfs/scratch/pr1ejg00/pr1ejg10/TEST/post-processing> ln -s ../TEST_fx_<run id>.sgthead
pr1ejg10@login2:/gpfs/scratch/pr1ejg00/pr1ejg10/TEST/post-processing> ln -s ../TEST_fy_<run id>.sgt
pr1ejg10@login2:/gpfs/scratch/pr1ejg00/pr1ejg10/TEST/post-processing> ln -s ../TEST_fy_<run id>.sgthead
pr1ejg10@login2:/gpfs/scratch/pr1ejg00/pr1ejg10/TEST/post-processing> /gpfs/scratch/pr1ejg00/pr1ejg10/TEST/post-processing/make_lns.py rupture_file_list_TEST /gpfs/projects/pr1ejg00/CyberShake/ruptures/Ruptures_erf36
Jan 24 20:55:45.870309> Sending complete message to process 83.
Jan 24 20:55:45.870318> Sending message to processor 83.
Jan 24 20:55:45.870326> Shutting down.
When complete, you will have 395 Seismogram, PeakVals, RotD, and Duration files. File formats are described in detail here.